Postman Pre-Request Script for Docebo API
I've recently been involved with a project at work to modernize the processes around Docebo, our Learning Management System (LMS). A significant portion of this project involves workflow automation and passing data/events between multiple systems. We accomplish this automation using webhooks and a number of API calls (which you can view at Docebo's API Browser). Early in the process, I stumbled onto the Docebo Community post about Using Postman (and the on-demand Community Coaching Session) which contained a downloadable Postman API collection. This was a GREAT starting point, but the collection used an interactive login to get oAuth2 tokens. I wanted to automate the authentication process and avoid the interactive logins when I was testing against our sandbox LMS instance.
Understanding Docebo oAuth API Authentication
Within the Postman collection, the original author configured the collection to use the Authorization Code + Implicit grant type authentication. In this scenario, Postman requires an interactive login to get your consent to generate the auhentication token. However, Docebo's API Authentication Documentation describes multiple oAuth2 API authentication methods, one of which is Resource Owner Password Credentials. In this authentication scenario, Postman makes a call to Docebo's oAuth Token URL and provides a number of formdata parameters in order to obtain an oAuth2 token. By using your vaulted Username and Password, Postman authenticates as you, allowing you to avoid the interactive login. Notice I mentioned vaulted credentials.
Setting up the Postman Vault
The Postman Vault was a relatively new feature to me. Basically, it's an encrypted collection of key-value pairs that remains local to your machine and doesn't get synced. This allowed me to keep my credentials local and secured while I reused them for my token authentication. Here's how to set it up:
-
To start, you need to access the Postman Vault by clicking the vault icon in the bottom right of the postman window. }
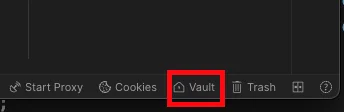
The Postman Vault Button -
Next, you'll need to add the client ID, client secret, username, and password to the vault. }
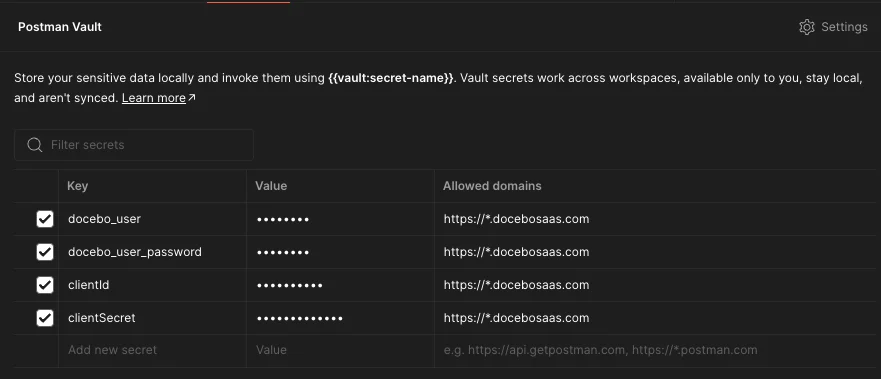
Adding Credentials to Postman Vault -
After that, you need to allow vault access from your scripts. From within your Postman vault, click Settings then enable the toggle for the option Enable support in Scripts. Click Enable in the pop-up and then close your settings screen.
-
The first time you call an API in the collection and your pre-request script runs, you'll have to Grant Access to the vault for your Collection. }

Granting Collection access to the Postman Vault
Configuring the Collection and APIs
At the time I started creating this script (not this blog post), I had to make some modifications to the original collection I had downloaded. I mostly implemented these changes as I went along with my testing - no need to do it all up front.
- On the Collection's Variables tab, I had to add a few new variables:
access_tokenandexpires_in. - On the Collection's Authorization tab I had to change the Authorization type to
Bearer Tokenand then set up the token to use the{{access_token}}collection variable my script modified. - For each folder and API in the collection, I had to ensure the Authorization tab showed the Auth Type as Inherit auth from parent.
Postman Pre-Request Script
Now it was time to add the pre-request script. Here's how you do that:
- With the Collection selected, click on the Scripts tab.
- Click on Pre-Request Script and paste the content of the script below.
- Save the Collection.
 1var baseUrl = pm.collectionVariables.get("base_Url");
 2var client_id = await pm.vault.get("clientId");
 3var client_secret = await pm.vault.get("clientSecret");
 4var docebo_uid = await pm.vault.get("docebo_user");
 5var docebo_upw = await pm.vault.get("docebo_user_password");
 6
 7const tokenUrl = baseUrl + '/oauth2/token';
 8
 9const getTokenRequest = {
10    method: 'POST',
11    url: tokenUrl,
12    body: {
13        mode: 'formdata',
14        formdata: [
15            {key: 'client_id', value: client_id,},
16            {key: 'client_secret', value: client_secret,},
17            {key: 'grant_type', value: 'password',},
18            {key: 'scope', value: 'api',},
19            {key: 'username', value: docebo_uid,},
20            {key: 'password', value: docebo_upw,}
21        ]
22    }
23};
24
25pm.sendRequest(getTokenRequest, (err, response) => {
26    const jsonResponse = response.json();
27    const newAccessToken = jsonResponse.access_token;
28    const expires_in = jsonResponse.expires_in;
29    const newScope = jsonResponse.scope;
30    pm.collectionVariables.set("access_token", newAccessToken);
31    pm.collectionVariables.set("expires_in", expires_in);
32    console.log('scope', newScope);
33});
Understanding the Script
To aid your understanding, let's walk through this script line-by-line:
| Script Line | Explanation |
|---|---|
var baseUrl = pm.collectionVariables.get("base_Url"); |
This gets the collection variable base_Url, which contains the URL of our docebo instance (example: https://sandbox.docebosaas.com). |
var client_id = await pm.vault.get("clientId"); |
This gets the clientId value you've stored in the Postman Vault. This value is originally generated in the Add oAuth2 App screen in Docebo. |
var client_secret = await pm.vault.get("clientSecret"); |
This gets the clientSecret value you've stored in the Postman Vault. This value is originally generated in the Add oAuth2 App screen in Docebo. |
var docebo_uid = await pm.vault.get("docebo_user"); |
This gets the docebo_user value you've stored in the Postman Vault. This value is your actual username (or a username you specifically configure for API access) in Docebo. |
var docebo_upw = await pm.vault.get("docebo_user_password"); |
This gets the docebo_user_password value you've stored in the Postman Vault. This value is the password associated to the account specified for docebo_user in the vault. |
const tokenUrl = baseUrl + '/oauth2/token'; |
This adds the oAuth2 Token URL path onto the base URL to create the token endpoint. Since we already store the base_Url in the collection to re-use in the URL field across all the API path definitions, we can re-use it in the pre-request script in the same way. |
The entire const getTokenRequest = { ... } block |
This sets up the form data that will be passed in the request to the token endpoint. The key items are as follows: * method: 'POST' sets the HTTP method Verb to POST* url: tokenUrl tells Postman where to send the request (using the tokenUrl derived from the base_Url in the Collection variables* body: tells Postman to add the following data to the body of the request* mode: 'formdata' tells Postman that the data in the body should be formatted like data gathered from an HTML form* {key: 'xxxxx', value: <variable>,}, are the lines where we include the values we need to POST in the form in order to authenticate for the token -- note that grant_type and scope are hardcoded as they are based on the authentication method we're using. |
pm.sendRequest(getTokenRequest, (err, response) => { |
This is the line that tells Postman to send the request as we've configured it in the getTokenRequest block. |
const jsonResponse = response.json(); |
This saves the HTTP response as JSON-formatted data. |
const newAccessToken = jsonResponse.access_token; |
This saves the access_token out of the JSON data. |
const newScope = jsonResponse.scope; |
This saves the token scope out of the JSON data (mostly for reference/troubleshooting). |
pm.collectionVariables.set("access_token", newAccessToken); |
This sets the value of a collection variable that is used in the Authorization tab for collection as a whole (i.e. the top level of the collection - all subfolders and API's Inherit from this parent). |
pm.collectionVariables.set("expires_in", expires_in); |
This sets the value of a collection variable that currently isn't used. I was storing this for a potential future improvement (see below) |
console.log('scope', newScope); |
This logs the value for token scope to the Postman Console for troubleshooting purposes. |
Putting It Together
With the Pre-request script in place, and the Collection and APIs modified, the authentication was working great. Here's a high level overview of what is happening:
- When I click Send on an API call, Postman first runs the Pre-Request Script.
- The Pre-Request Script pulls the secrets from the vault and the collection variables, sends the request to the oAuth2 token endpoint, and gets a token which it saves as the
access_tokenvariable for the collection. - The API inherits the Authentication configuration from the Folder and Collection (parent), which sets the Auth Type to
Bearerand uses the{{access_token}}from the collection variables. - Postman sends the API request.
Potential Improvements
I created this script to speed up my workflow and was mostly concerned with just getting authenticated. That said, there's definitely room for improvement on this script. Were I to later iterate on this script, here's a few items I would modify:
- Saving the access_token to the Vault: I agree, saving the
access_tokento the collection isn't the most secure way to handle this, but I ran into some errors trying to set the access_token value into the vault during the sendRequest function. This is definitely something I need to research and fix. - Integration with a Password Manager: Rather than using Postman's vault, I would prefer to leverage my current password manager. I don't particularly like that my username and password exist outside the vault, but since it's a sandbox environment I'm less concerned. I know the Enterprise licenses include integration with a few password managers, but I'm using the free plan. My thought is perhaps I can leverage the password manager's CLI utility as part of the pre-request script. To be continued...
- Token Re-Use and Expiry: In it's current form, this pre-request script requests a new oAuth2 token every time I execute an API call. To improve on this, I should be tracking the token expiry as a Collection variable. At the beginning of the script, I should be checking if the token is expired, and if not, re-use the current token rather than requesting a new one.
- JWT Assertions on the fly: I did experiment with JWT, but I wasn't able to figure out a method to create the JWT assertion on the fly. This one will require more digging and practice.
Bonus Round - JSON Web Token Pre-Request Script
I was also testing with JSON Web Tokens, but this is far more difficult to set up. If you go the JWT route, be mindful of how you create the assertion and what tools you're using to do so. While I used JWT.io to create my assertion, this was low risk as I was testing in a sandbox environment for a short period of time. If you are a brave soul that wants to try setting this up, here is a pre-request script that might help get you started:
 1var baseUrl = pm.collectionVariables.get("base_Url");
 2var client_id = await pm.vault.get("clientId");
 3var client_secret = await pm.vault.get("clientSecret");
 4
 5// Assertion from JWT.io using the Public/Private Keys
 6var jwt_assertion = await pm.vault.get("assertion");
 7
 8const tokenUrl = baseUrl + '/oauth2/token';
 9
10const getTokenREquest = {
11    method: 'POST',
12    url: tokenUrl,
13    body: {
14        mode: 'formdata',
15        formdata: [
16            {key: 'client_id', value: client_id},
17            {key: 'client_secret', value: client_secret,},
18            {key: 'grant_type', value: 'urn:ietf:params:oauth:grant-type:jwt-bearer',},
19            {key: 'assertion', value: jwt_assertion,}
20        ]
21    }
22};
23
24pm.sendRequest(getTokenREquest, (err, response) => {
25    const jsonResponse = response.json();
26    const newAccesesToken = jsonResponse.access_token;
27    const newScope = jsonResponse.scope;
28    pm.collectionVariables.set("access_token", newAccesesToken);
29    pm.collectionVariables.set("scope", newScope);
30});
Feedback Welcome
Do you use Postman also? Feel free to share some tips and tricks you've found helpful, or leave a link to any of your pre/post request scripts that you'd like to share!