Deploying NoMAD over VMware Per-App Tunnel
Overview
Some folks recently reached out to me asking for help figuring out how to route NoMAD traffic over VMware Tunnel. Basically, the ask was to use Per-App Tunneling to give NoMAD the ability to obtain Kerberos Tickets and Sync AD passwords without being directly on the Enterprise network. If you're familiar with my previous article about the macOS Catalina Kerberos SSO Plugin, you'll know that Apple's built-in functionality in Catalina doesn't work well with Per-App Tunneling.
So Why Try NoMAD
If you're not familiar with NoMAD, it's an open-source app meant to help a user on a non-bound Mac obtain Kerberos tickets and sync their local password with a directory (Active Directory) password. It's similar in functionality to Apple's Enterprise Connect tool (available through Apple Professional Services). Our hope with trying NoMAD was to give someone the ability to do the same Kerberos/SSO functionality on Catalina that you can potentially do on Big Sur. The idea was not meant for long-term use and was more-so a stop-gap until devices were upgraded to Big Sur.
Setting Up NoMAD in Workspace ONE UEM
As you go through the setup, you'll need to set up the following:
- Create and Assign a Custom Settings profile with NoMAD Preferences.
- Parse the NoMAD.pkg with Workspace ONE Admin Assistant
- Modify the metadata plist to use an installs array if you would rather check for the app versus the receipt
- Upload and create the Internal App. Add a post-install script that creates the LaunchAgent.
- Modify the Tunnel Device Traffic Rules to route traffic to your domain (AD and DNS, or *.yourdomain.com) over the per-app tunnel.
- SAVE the configuration!!
The balance of this blog post hits on the not-so-obvious configurations you'll need to make in order to get this app deployed and working via Workspace ONE:
Profiles
Custom Settings XML for NoMAD Preferences
When setting up the Custom Settings XML, you'll need to refer to the list of preferences keys to figure out what is best for your setup. I've included a basic Custom Settings XML profile below. That said, a few gotchas you may want to consider:
- KerberosRealm needs to be specified in ALL CAPS.
- Determine if you want to supply the LDAPServerList to specify a list of DC's. Without including this, NoMAD attempts to find DC's via DNS.
 1<dict>
 2    <key>PayloadDisplayName</key>
 3    <string>NoMAD Preferences</string>
 4    <key>PayloadIdentifier</key>
 5    <string>com.trusourcelabs.NoMAD.8B3D35B1-61AD-4017-97BA-A383A61B90FA</string>
 6    <key>PayloadOrganization</key>
 7    <string>VMware</string>
 8    <key>PayloadType</key>
 9    <string>com.trusourcelabs.NoMAD</string>
10    <key>PayloadUUID</key>
11    <string>8B3D35B1-61AD-4017-97BA-A383A61B90FA</string>
12    <key>PayloadVersion</key>
13    <integer>1</integer>
14    <key>ADDomain</key>
15    <string>YOURDOMAIN.COM</string>
16    <key>KerberosRealm</key>
17    <string>YOURDOMAIN.COM</string>
18    <key>RenewTickets</key>
19    <string>1</string>
20    <key>SecondsToRenew</key>
21    <string>7200</string>
22    <key>ShowHome</key>
23    <string>0</string>
24    <key>Template</key>
25    <string>User Auth</string>
26    <key>UseKeychain</key>
27    <true/>
28    <key>Verbose</key>
29    <true/>
30    <key>DontShowWelcome</key>
31    <true/>
32    <key>HideAbout</key>
33    <true/>
34    <key>HidePrefs</key>
35    <true/>
36    <key>HideGetSoftware</key>
37    <true/>
38    <key>LDAPServerList</key>
39    <string>dc1.yourdomain.com,dc2.yourdomain.com</string>
40    <key>LocalPasswordSync</key>
41    <true/>
42    <key>RenewTickets</key>
43    <true/>
44</dict>
Configurations
Per-App Tunnel Device Traffic Rules
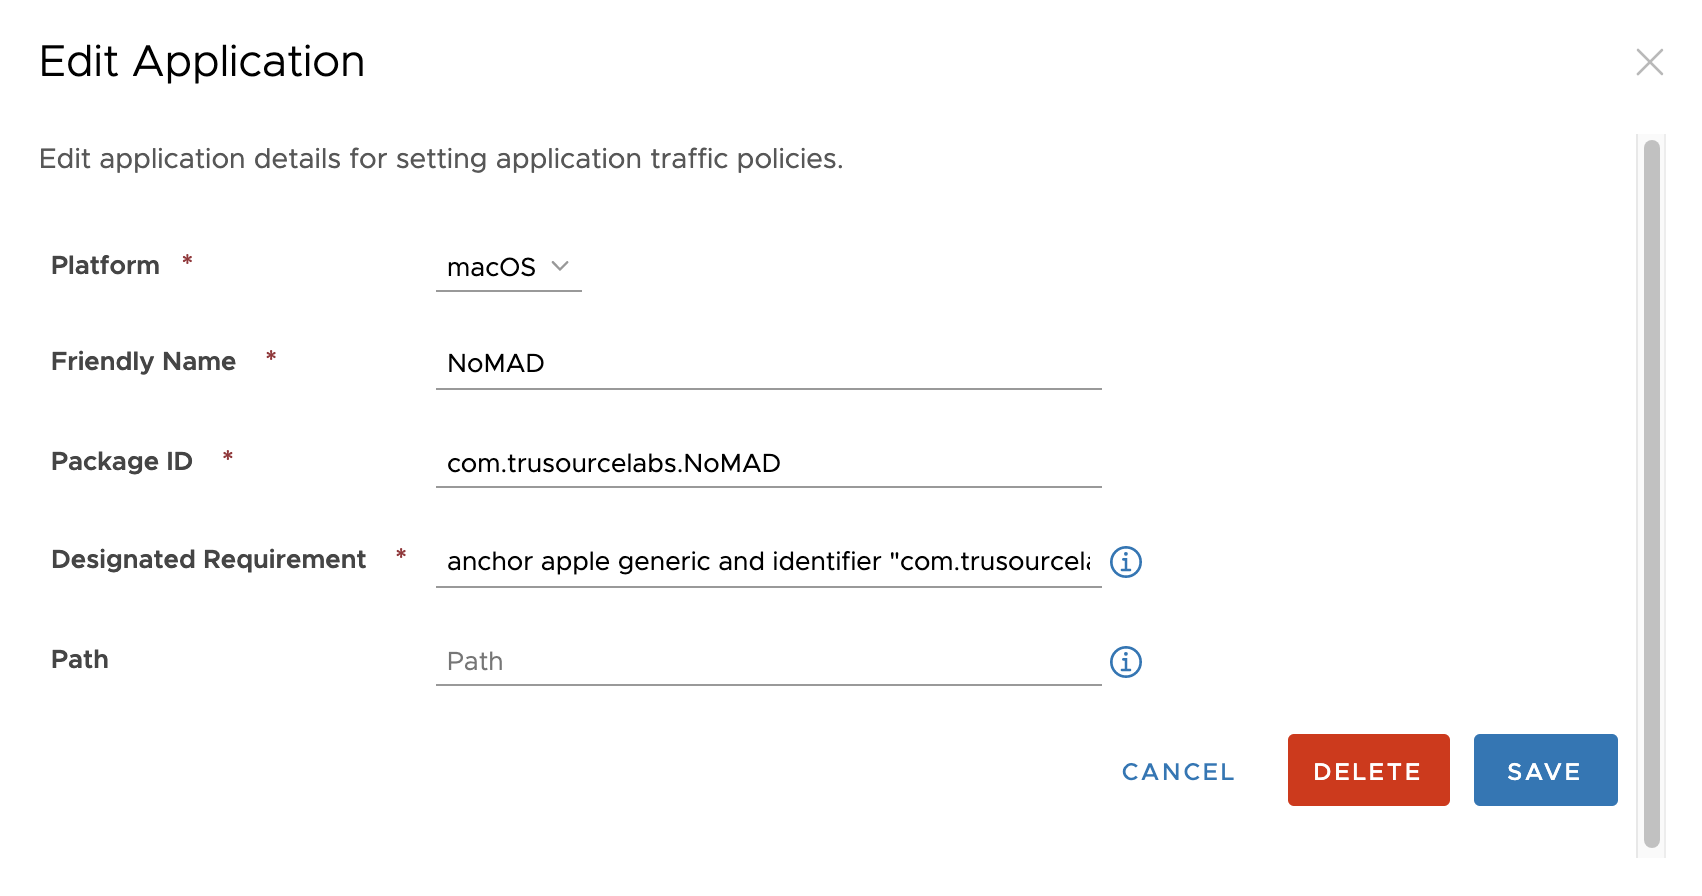
In the Device Traffic Rules, you'll first need to set up the macOS App Definition. The critical info you'll need is this:
- Platform: macOS
- Friendly Name: NoMAD
- Package ID:
com.trusourcelabs.NoMAD - Designated Requirement:
anchor apple generic and identifier "com.trusourcelabs.NoMAD" and (certificate leaf[field.1.2.840.113635.100.6.1.9] /* exists */ or certificate 1[field.1.2.840.113635.100.6.2.6] /* exists */ and certificate leaf[field.1.2.840.113635.100.6.1.13] /* exists */ and certificate leaf[subject.OU] = AAPZK3CB24)
With the App definition in place, you can then add your device traffic rule. Set Safari and NoMAD to Tunnel to the list of DCs you've placed in your serverlist (or you can simply with a wildcard) -- *.domain.com. I add Safari so I can do some testing but it is optional.
Scripts
PostInstall Script for NoMAD Internal App
When setting up NoMAD as an internal application for macOS, you'll want to add the following as a post install script:
 1#!/bin/sh
 2/usr/local/bin/hubcli profiles --install 1041 #Where the number is the profile ID for the NoMAD Custom Settings
 3/usr/bin/touch /Library/LaunchAgents/com.trusourcelabs.NoMAD.plist
 4/bin/cat > /Library/LaunchAgents/com.trusourcelabs.NoMAD.plist <<- EOM
 5<?xml version="1.0" encoding="UTF-8"?>
 6<!DOCTYPE plist PUBLIC "-//Apple//DTD PLIST 1.0//EN" "http://www.apple.com/DTDs/PropertyList-1.0.dtd">
 7<plist version="1.0">
 8<dict>
 9<key>KeepAlive</key>
10<true/>
11<key>Label</key>
12<string>com.trusourcelabs.NoMAD</string>
13<key>LimitLoadToSessionType</key>
14<array>
15<string>Aqua</string>
16</array>
17<key>ProgramArguments</key>
18<array>
19<string>/Applications/NoMAD.app/Contents/MacOS/NoMAD</string>
20</array>
21<key>RunAtLoad</key>
22<true/>
23</dict>
24</plist>
25EOM
Summary
It's important to note that much of what I've done in this post is applicable to many other Apps that you'd commonly deploy with Workspace ONE UEM. That said, I expect that some of this procedure will change over time as FreeStyle gains additional functionality.